Notice
Recent Posts
Recent Comments
Link
맥에서 오픈소스로
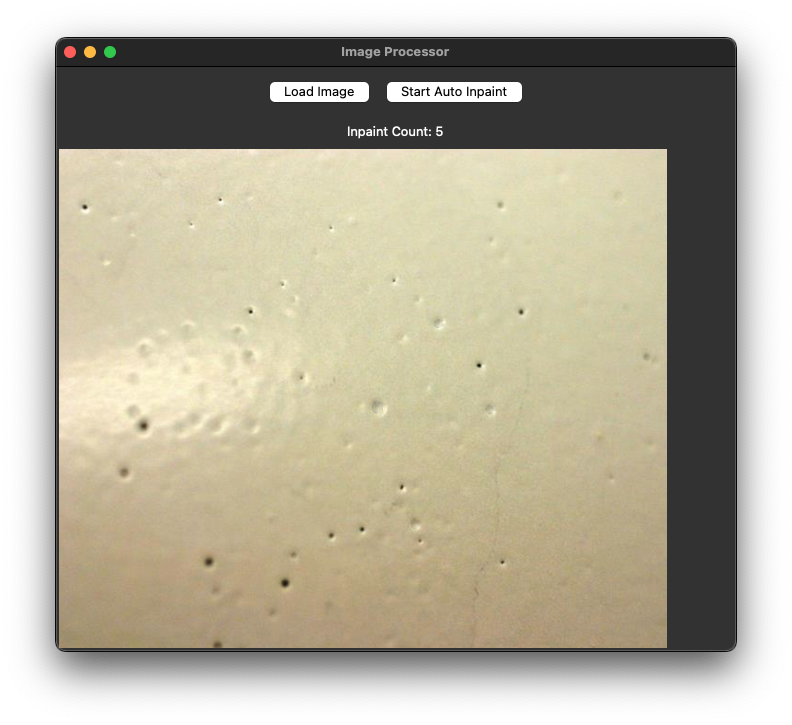
SRSM > SAM > cv2.InPaint() 본문
- 데모 비디오 : https://youtu.be/VTwPJsRF3d4?si=7hwREP96ai1hIvqY
- 데모 비디오2: https://youtu.be/TNNuDRo0C-Y?si=hQhsYAnaCaBBpF2G
import tkinter as tk
from tkinter import filedialog, messagebox
from PIL import Image, ImageTk
import cv2
import numpy as np
from segment_anything import sam_model_registry, SamPredictor
## computer vision package in Frequency Domain
import openfv as fv
import threading
import time

class ImageProcessorApp:
   def __init__(self, root):
       self.root = root
       self.root.title("Image Processor")

       # SAM 모델 초기화
       self.sam_checkpoint = "/Users/air/Downloads/sam_vit_b_01ec64.pth"
       self.model_type = "vit_b"
       self.device = "mps"
       self.sam = sam_model_registry[self.model_type](checkpoint=self.sam_checkpoint)
       self.sam.to(device=self.device)
       self.predictor = SamPredictor(self.sam)

       # 변수 초기화
       self.current_image = None
       self.processed_image = None
       self.inpaint_count = 0
       self.processing = False

       # UI 구성
       self.create_widgets()

   def create_widgets(self):
       # 버튼 프레임
       btn_frame = tk.Frame(self.root)
       btn_frame.pack(side=tk.TOP, pady=10)

       # 이미지 로드 버튼
       self.load_btn = tk.Button(btn_frame, text="Load Image", command=self.load_image)
       self.load_btn.pack(side=tk.LEFT, padx=5)

       # SRSM Inpaint 버튼
       self.process_btn = tk.Button(btn_frame, text="Start Auto Inpaint", command=self.toggle_auto_inpaint)
       self.process_btn.pack(side=tk.LEFT, padx=5)

       # 카운터 레이블
       self.counter_frame = tk.Frame(self.root)
       self.counter_frame.pack(side=tk.TOP, pady=5)

       self.counter_label = tk.Label(self.counter_frame, text="Inpaint Count: 0")
       self.counter_label.pack()

       # 이미지 표시 캔버스
       self.canvas = tk.Canvas(self.root)
       self.canvas.pack(expand=True, fill=tk.BOTH)

   def load_image(self):
       file_path = filedialog.askopenfilename()
       if file_path:
           self.original_image = cv2.imread(file_path)
           self.current_image = self.original_image.copy()
           self.inpaint_count = 0
           self.update_counter()
           self.display_image()

   def toggle_auto_inpaint(self):
       if self.processing:
           self.processing = False
           self.process_btn.config(text="Start Auto Inpaint")
       else:
           if self.current_image is None:
               messagebox.showwarning("Warning", "Please load an image first.")
               return

           self.processing = True
           self.process_btn.config(text="Stop Auto Inpaint")
           # 별도의 스레드에서 자동 인페인팅 실행
           threading.Thread(target=self.auto_inpaint, daemon=True).start()

   def auto_inpaint(self):
       while self.processing:
           self.process_image()
           time.sleep(1)  # 1초 대기
           # GUI 이벤트 루프가 계속 작동하도록 업데이트
           self.root.update_idletasks()

   def process_image(self):
        if self.current_image is None:
            return

        # 현재 이미지 크기 저장
        h, w = self.current_image.shape[:2]

        # 그레이스케일 변환
        gray = cv2.cvtColor(self.current_image, cv2.COLOR_BGR2GRAY)

        # 이미지 크기의 기하평균의 1/8 계산
        geometric_mean = int(np.sqrt(w * h))
        sr_size = max(64, geometric_mean // 4)  # 최소 64 보장

        # 동적 크기로 spectral residual saliency 계산
        SM = fv.ww_spectral_residual_saliency(gray, size=sr_size)

        # 원본 크기로 리사이징
        resized_SM = cv2.resize(SM, (w, h), interpolation=cv2.INTER_CUBIC)

        # 가장 밝은 픽셀 찾기
        min_val, max_val, min_loc, max_loc = cv2.minMaxLoc(resized_SM)

        # SAM 예측
        self.predictor.set_image(self.current_image)
        input_point = np.array([[max_loc[0], max_loc[1]]])
        input_label = np.array([1])

        mask, _, _ = self.predictor.predict(
            point_coords=input_point,
            point_labels=input_label,
            multimask_output=False
        )

        # 마스크를 현재 이미지 크기에 맞게 조정
        binary_mask = (mask.astype(np.uint8) * 255).reshape(h, w)  # 크기와 차원 명시적 조정

        # 고급 인페인팅: TELEA와 NS 알고리즘 모두 사용하여 결과 향상
        inpainted_telea = cv2.inpaint(self.current_image, binary_mask, 3, cv2.INPAINT_TELEA)
        inpainted_ns = cv2.inpaint(self.current_image, binary_mask, 7, cv2.INPAINT_NS)

        # 두 결과를 블렌딩하여 더 나은 결과 도출
        alpha = 0.5
        inpainted_img = cv2.addWeighted(inpainted_telea, alpha, inpainted_ns, 1-alpha, 0)

        # 현재 이미지 업데이트
        self.current_image = inpainted_img

        # 인페인팅 카운트 증가
        self.inpaint_count += 1
        self.update_counter()

        # 이미지 디스플레이 업데이트
        self.display_image()

   def update_counter(self):
       self.counter_label.config(text=f"Inpaint Count: {self.inpaint_count}")

   def display_image(self):
       if self.current_image is not None:
           # OpenCV BGR to RGB 변환
           rgb_image = cv2.cvtColor(self.current_image, cv2.COLOR_BGR2RGB)

           # PIL Image로 변환
           pil_image = Image.fromarray(rgb_image)

           # 캔버스 크기에 맞게 리사이징
           canvas_width = self.canvas.winfo_width()
           canvas_height = self.canvas.winfo_height()

           if canvas_width > 1 and canvas_height > 1:  # 캔버스가 초기화되었는지 확인
               ratio = min(canvas_width/pil_image.width, canvas_height/pil_image.height)
               new_width = int(pil_image.width * ratio)
               new_height = int(pil_image.height * ratio)
               pil_image = pil_image.resize((new_width, new_height), Image.LANCZOS)

           # PhotoImage로 변환
           self.photo = ImageTk.PhotoImage(pil_image)

           # 캔버스 크기 조정 및 이미지 표시
           self.canvas.delete("all")
           self.canvas.create_image(0, 0, anchor=tk.NW, image=self.photo)

# 메인 윈도우 생성 및 실행
if __name__ == "__main__":
   root = tk.Tk()
   app = ImageProcessorApp(root)
root.mainloop()'딥러닝' 카테고리의 다른 글
| 끌로드 + MCP 로 인터넷정보를 검색하여 대답을 요청하기 (1) | 2025.04.09 |
|---|---|
| 터미널에서 onnx 내부구조 알아내기 (1) | 2025.01.23 |
| 오늘의 대화: 소수 + 이미지 오그먼테이션 (2) | 2025.01.20 |
| 오늘의 대화: 소수 + 딥러닝 (0) | 2025.01.20 |
| LabelClass (0) | 2024.11.24 |
'딥러닝' Related Articles
more
